VitoPlantamura.com logo - Click here to go to the site home page... Click here to go to the site home page... Click here to go to the Blog page... Click here to go to the archives page... Click here to go to the about page...
"extremely impressive work"
- Mark Russinovich, www.sysinternals.com
(referring to my BugChecker)
my face...
Homepage of Vito Plantamura (@, LinkedIn), Windows Researcher and Developer. [user=Guest] - updated: August 08, 2007
 NDIS MONITOR .NET 32-bit v1.00 for Windows 2K, XP, 2K3 (with source code)
NDIS MONITOR .NET 32-bit v1.00 for Windows 2K, XP, 2K3

NDIS Monitor is a rather complex example application written (for the front-end) with the Microsoft .NET WinForms technology that allows to catch and log the exchange of packets data between NDIS miniport drivers and network protocol modules that occurs in kernel space.

    Check out my NDIS Monitor's article on The Code Project here, for a more simplified description of how to use the program.    

It is a kind of simple but extremely extensible packet analyzer with the unique feature of being able to intercept loopback exchange of packets that occurs to and from the Microsoft Loopback Adapter (more on this later). Also with it you can monitor the NDIS action of WAN Adapters (like ADSL Modems, for example). It doesn't require any kind of installation: run it, select which miniport to hook and start seeing packets as they are sent and received from the network. It demonstrates also a bunch of advanced .NET features at work used in a real-world application: Multithreading, Message Filtering, Reflection, CodeDom, WinForm UserControls, PInvoke, Marshaling from the unmanaged space, Synchronization through Windows Messages etc. The source code is fully commented.


FEATURES

     Compatible with 32 bit versions of Windows 2000, XP, 2003.
     Hooking of Ethernet Adapters in order to show exchange of packets that occurs with corresponing NDIS Protocols.
     Hooking of Protocols such as "TCPIP_WANARP" gives access to the packets sent to and received from devices such as ADSL Modems.
     Integrated and extensible packet analyzer.
     Special NAT feature that allows the monitoring of the data sent to and received from the Microsoft Loopback Adapter.
     Open and Save features of a packet log in a proprietary file format (".nmc" files).
     Integrated C# script window and CodeDom compiler that allows the writing of filters and analyzers of the packet data on the fly.
     Integrated output window that allows the log of actions and messages by the script code.
     Object model for representing received packet data for allowing the writing of more abstract script code.
     Automatic saving of the script code.

SCREENSHOTS

These are other screenshots of the application at work:


INTRODUCTION

Some time ago, I had the opportunity to write a tunneling application that had the requirement of catching and redirecting TCP/IP communication over several TCP and UDP ports to a single TCP port for transmission via the World Wide Web. In that occasion I conducted a very extensive research about the topic/problem and evaluated a bunch of several, possible solutions. One of the requirement of the project was that the resulting technology had to be consumed without any kind of previous installation: the end user had to be saved from the bother of rebooting his machine, for example. In that occasion, I preferred a completely user mode solution: I wrote an hook for several WinSock APIs and was able to intercept the send and receive requests of a well-known application executable in order to forward the hooked stream of data to a TCP-connected peer in another part of the network. Among the various technologies and solutions I researched one in particular attracted my attention because of its flexibility and uniformity: NDIS miniport driver APIs hooking. As I discovered later the base approach of the technique I implemented in the kernel driver that NDIS Monitor calls in order to obtain packet data and statistics from kernel space is well-known, rather documented and even implemented in commercial-class products such as personal/corporate firewalls and VPN servers.

TWO WORDS ABOUT THE NDIS HOOK METHOD

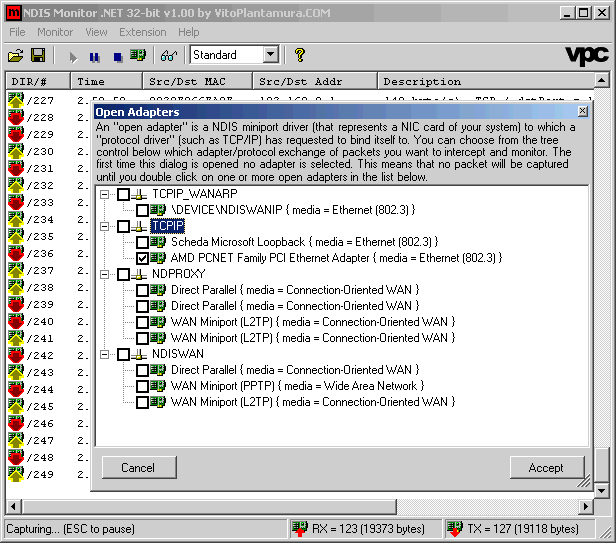
NDIS Miniport drivers are special device drivers that the Operating System loads in order to control the NIC card(s) that are installed in your system. One of the main purposes of this type of drivers is sending and receiving data through the NIC card: then, this data, represented in the form of Packets, can be forwarded to the corresponding higher level driver(s) that are bound to the Miniport Driver itself. Generally these "higher level drivers" are transport protocol drivers, such as the "TCPIP" one that you can see in the screenshot above. The NDIS library sits in between the Miniport driver and the Transport driver for managing the interaction between the two components. The binding between the protocol driver and the miniport driver is generally set up by the NDIS library when the protocol driver itself calls the "NdisOpenAdapter" API.

The hooking system described in this article and implemented in the NDIS Monitor application itself leverages this architecture and is aimed to intercept the exchange of packet data that occurs between an arbitrary NDIS Miniport driver and its bound NDIS Protocol module.

In this specific case, the approach to the hook problem consists in the replacement of several function pointers in two proprietary and so-so documented NDIS structures: NDIS_OPEN_BLOCK and NDIS_MINIPORT_BLOCK. The former structure represents a binding between a Miniport and a Protocol driver, while the latter structure contains various informations that are specific to every registered Miniport driver in a system. The solution described here is in part made possible by the fact that a bunch of fundamental NDIS APIs are implemented as macros in the corresponding NDIS header files (such as the "NdisMTransferDataComplete" API). For the sake of precision, when compiling miniport drivers for the Intel x86 Architecture, for binary compatibility reasons between Windows 98/ME and Windows NT-based systems, several NDIS APIs are declared as static functions (imported from NDIS.SYS) instead of macros that directly reference NDIS structure's fields. The not-compiled, macro versions of the prototypes of these functions (selectively excluded from x86 compilations) constitute however an important indication about the mapping between a NDIS API and its corresponding field in a NDIS native structure. You can check it out by yourself looking at the main NDIS header file available in the standard DDK installation (NDIS.H) and searching for API names such as "NdisSend"...

Specifically, for our hook purposes, we need to get a peek at the parameters of the following NDIS functions as they are called by the involved players:

     NdisSend function: this function is called by a protocol driver whenever there is a packet to send through the specified adapter. Actually the NdisBindingHandle parameter is a pointer to the corresponding NDIS_OPEN_BLOCK structure whose "SendHandler" field points to the actual Miniport implementation (as can be argued looking at the macro version of the declaration of this function). Hooking this function can enable the hooker to get a peek at the NDIS_PACKET structure that represents the outgoing packet that the protocol wants to send through the network. NDIS Monitor job is collecting these packets, converting them in linear-memory allocations and storing them in an opportunely synchronized circular buffer ready to be retrieved by a user mode application upon the reception of a special IOCTL request, in our case. A firewall application can, for example, reject this function invocation and not to call the original miniport-implemented function, not allowing the packet to reach the wire. A VPN application can reroute this packet (encapsulating it as needed) and (eventually) forward it to another NIC Miniport, for example. The prototype is:
VOID
  NdisSend(
    OUT PNDIS_STATUS  Status,
    IN NDIS_HANDLE  NdisBindingHandle,
    IN PNDIS_PACKET  Packet
    );
     ProtocolReceive function as specified in the "ReceiveHandler" and "PostNt31ReceiveHandler" fields of the NDIS_OPEN_BLOCK structure. This function (implemented by a protocol driver) is called by NDIS whenever a function such as "NdisMIndicateReceivePacket" is called by a bound Miniport driver in the case a new packet arrives from the network. The job of the NDIS Monitor application is the same as in the NdisSend case: the packet is simply stored in a circular buffer, waiting to be fetched by the user mode application. The prototype is:
NDIS_STATUS
  ProtocolReceive(
      IN NDIS_HANDLE  ProtocolBindingContext,
      IN NDIS_HANDLE  MacReceiveContext,
      IN PVOID  HeaderBuffer,
      IN UINT  HeaderBufferSize,
      IN PVOID  LookAheadBuffer,
      IN UINT  LookaheadBufferSize,
      IN UINT  PacketSize
      );
     NdisSendPackets function as specified in the "SendPacketsHandler" field of the NDIS_OPEN_BLOCK structure: this function is called by a protocol driver whenever there is an array of packets to send through the specified adapter. The prototype is:
VOID
  NdisSendPackets(
    IN NDIS_HANDLE  NdisBindingHandle,
    IN PPNDIS_PACKET  PacketArray,
    IN UINT  NumberOfPackets
    );
     ProtocolReceivePacket function as specified in the "ReceivePacketHandler" field of the NDIS_OPEN_BLOCK structure: this function is implemented by a Protocol driver that wants to be notified when a new packet arrives from the network. The prototype is:
INT
  ProtocolReceivePacket(
      IN NDIS_HANDLE  ProtocolBindingContext,
      IN PNDIS_PACKET  Packet
      );
     NdisTransferData function as specified in the "TransferDataHandler" field of the NDIS_OPEN_BLOCK structure: this function is tipically called in the context of a "ProtocolReceive" invocation in order to obtain the remaining bytes of a received packet. NDIS Monitor hooks this function in order to avoid to call the original function directly in its own hook of "ProtocolReceive": infact this function (if the received packet is of interest to the target protocol) is already called by the protocol driver itself and the documentation advises not to call NdisTransferData more that once from the same protocol. NDIS Monitor intercepts the invocation and parameter data of this function when called by the underlying protocol and then integrates the resulting packet data to the Media header and Lookaheader buffer bytes previously passed to the "ProtocolReceive" function. The prototype is:
VOID
  NdisTransferData(
    OUT PNDIS_STATUS  Status,
    IN NDIS_HANDLE  NdisBindingHandle,
    IN NDIS_HANDLE  MacReceiveContext,
    IN UINT  ByteOffset,
    IN UINT  BytesToTransfer,
    IN OUT PNDIS_PACKET  Packet,
    OUT PUINT  BytesTransferred
    );
     NdisMTransferDataComplete function as specified in the "TDCompleteHandler" field of the NDIS_MINIPORT_BLOCK structure. This function is called by a Miniport driver whenever a "NdisTransferData" invocation that returned NDIS_STATUS_PENDING completes. NDIS Monitor intercepts the invocation of this function and puts the returned packet data in the circular buffer. The prototype is:
VOID 
  NdisMTransferDataComplete(
    IN NDIS_HANDLE  MiniportAdapterHandle,
    IN PNDIS_PACKET  Packet,
    IN NDIS_STATUS  Status,
    IN UINT  BytesTransferred
    );

But now a legitimate question arises: how to get a pointer to the aforementioned NDIS_OPEN_BLOCK and NDIS_MINIPORT_BLOCK structures? Remember that the NDIS_OPEN_BLOCK structure represents a binding between a Protocol driver and a Miniport diver. However, the answer is pretty simple if you look at the definitions of the structures themselves: the NDIS_OPEN_BLOCK structures allocated for a given protocol in response to "NdisOpenAdapter" invocations are organized in kernel memory as a linked list of elements and iterating through that list is simply a matter of reading a pointer in a loop. A more interesting problem is posed when you want to obtain a pointer to the head item of the linked list itself: the solution I have studied involves the creation of a fake protocol for obtaining a pointer to a NDIS_PROTOCOL_BLOCK structure that the system allocates in response to a NdisRegisterProtocol invocation. Furthermore, as expected, also the protocol structures are organized in memory as a linked list. Now, as you can guess, the head item of the NDIS_OPEN_BLOCK linked list we are searching for is pointed by a field of that NDIS_PROTOCOL_BLOCK. The structure of the HookInstalledProtocols function that I have implemented in my driver is roughly as follows:

__try
{
      hProtocol = hFakeProtocolHandle;
      while( hProtocol = GetNextProtocol( hProtocol ) )
      {
            pobAdapter = GetOpenQueue( hProtocol );
            if ( pobAdapter )
            {
                  do
                  {
                        ...
                  } while( pobAdapter = GetNextOpen( pobAdapter ) );
            }
      }
}
__except ( EXCEPTION_EXECUTE_HANDLER )
{
      ...
}
I have omitted about 500 lines of code but the source above should give you an enough complete idea of what happens when the driver receives the IOCTL_VPCKNT_INITIALIZE_HOOK IRP. The idea of creating a fake protocol in order to get a pointer to a first element (of type NDIS_PROTOCOL_BLOCK) that would initiate the whole startup iteration, as I discovered later, is not unknown to NDIS experts around the web. Furthermore it seems that more that one commercial-class product is based on this trick for imposing their network logic to the host system.

Before finishing this talk about the NDIS hooking aspects of NDIS Monitor, I suppose it may be interesting spending two words about the call dispatching mechanism itself that reroutes NDIS function calls to our hook procedures. Fundamentally each function pointer stored in the aforementioned NDIS native structures is replaced by a pointer to the following structure, allocated in the NonPagedPool space of kernel memory (so satisfying the potential higher-level IRQL demands of a NDIS caller and, in the upcoming 64-bit version of NDIS Monitor, preventing Data Execution Protection BugChecks on Windows XP SP2):

#pragma pack(push, 1)
 
      typedef struct _NDISHOOK_HANDLER_STUB
      {
            BYTE              bPushImm32Opcode;       // It is 0x68.
            DWORD             dwOperationID;          // Identifier of the stub.
            BYTE              bJmpRel32Opcode;        // It is 0xE9.
            DWORD             dwJmpDisplacement;      // Relative address.
 
            BYTE              bPad[ 0x6 ];            // PAD: 0, 0, 0, 0, 0, 0
 
      } NDISHOOK_HANDLER_STUB, *PNDISHOOK_HANDLER_STUB;
 
#pragma pack(pop)

This structure, when filled with the correct data, will reroute the processor execution to the following assembler function (however first pushing the identifier of the stub itself onto the stack):

static PVOID                        g_vpvHandlersVector[] =
                                                {
                                                      & New_SendHandler,                    // SENDHANDLER_FNID
                                                      & New_ReceiveHandler,                 // RECEIVEHANDLER_FNID
                                                      & New_PostNt31ReceiveHandler,         // POSTNT31RECEIVEHANDLER_FNID
                                                      & New_SendPacketsHandler,             // SENDPACKETSHANDLER_FNID
                                                      & New_TransferDataHandler,            // TRANSFERDATAHANDLER_FNID
                                                      & New_ReceivePacketHandler,           // RECEIVEPACKETHANDLER_FNID
                                                      & New_TDCompleteHandler               // TDCOMPLETEHANDLER_FNID
                                                };
 
static void __declspec(naked) HandlerGeneralDispatcher ( void )
{
      __asm
      {
            // ### Load in EAX and ECX the Code found in the Stack. ###
 
            mov         eax, dword ptr[ esp ]        // eax = Code: 0xYYYYZZZZ. (y = Adapter Ordinal, z = Handler Ordinal.)
            mov         ecx, eax                     // ecx = Code: 0xYYYYZZZZ.
 
            shr         eax, 0x10                    // eax = 0x0000YYYY
            and         ecx, 0xFFFF                  // ecx = 0x0000ZZZZ
 
            mov         dword ptr[ esp ], eax        // Updates Code in Stack: 0x0000YYYY
 
            // ### Call the appropriate Handler based on the Handler Ordinal. ###
 
            lea         eax, [ offset g_vpvHandlersVector + ecx * 4 ];
            call        dword ptr[ eax ]
 
            // ### Pop in ECX the "HookPrivateStorage" parameter. ###
 
            pop         ecx
 
            // ### Check whether we have to call the Original Handler or we have to return control to the Caller. ###
 
            cmp         ecx, 0x1000
            ja          callOriginalHandler
 
            // ### Return the Control to the Caller. ###
 
            pop         edx
            add         esp, ecx
            jmp         edx
 
callOriginalHandler:
 
            // ### Call the Original Handler. ###
 
            jmp         ecx
      }
}

This function, according to a special value that is returned in the stack by the target hook function chooses whether to call or not the original implementation and whether the stack pointer has to be updated accordingly. This is an example of an handler that is called by this procedure:

NDIS_STATUS __cdecl New_SendHandler( IN OUT DWORD HookPrivateStorage, IN OUT DWORD CallingFnRetAddress, IN OUT NDIS_HANDLE MacBindingHandle, IN OUT PNDIS_PACKET Packet )
{
      NDIS_STATUS                   nsRetStatus = NDIS_STATUS_SUCCESS;
      SEND_HANDLER                  pfnOriginal = NULL;
      DWORD                         OpenAdapterId = HookPrivateStorage;
      PDEVICE_EXTENSION             pdeExtension = g_pDeviceObject->DeviceExtension;
      BOOLEAN                       bExecuteOriginalHandler = TRUE;
 
      // Get a pointer to the Original Handler.
 
      pfnOriginal = g_pntoaAdapters[ OpenAdapterId ].Original_SendHandler;
 
      // Check if we have to intercept the NDIS Request.
 
      if ( pdeExtension->InterceptNDIS )
            bExecuteOriginalHandler = Intercept_SendHandler(
                  & g_pntpProtocols[ g_pntoaAdapters[ OpenAdapterId ].dwProtocolOrd ], & g_pntoaAdapters[ OpenAdapterId ],
                  & nsRetStatus, & MacBindingHandle, & Packet );
 
      // Make call the Original Handler and return.
 
      if ( bExecuteOriginalHandler )
            HookPrivateStorage = (DWORD) pfnOriginal; // Original Handler.
      else
            HookPrivateStorage = 2 * 0x4; // Passed Parameters Size.
 
      return nsRetStatus;
}

HOW NDIS MONITOR WORKS

When first launched, NDIS Monitor tries to enumerate and get a list of all the extensions that will be made available to the user later. This is accomplished enumerating the list of .DLL files in the "bin" sub-directory of its application folder and then, through Reflection, trying to load the found assemblies. The types that correspond to the requirements of a NDIS Monitor Extension (see the paragraph about extension writing later in this same article for more info) are detected and cached in a special structure ("ExtensionInfo"). Also the combo box in the toolbar is populated with the names of these extensions.

At this point the user is required to select an Extension from that combo box: two extensions are provided by default with the ZIP archive of the program (the "Standard" and the "User Example" extensions). The former extension is the default one: it is implemented allowing the user to view the NDIS packets send/receive action in real-time in a List View control and to view the byte contents of a packet of interest double-clicking on the corresponding row. The latter extension is simply an example of a custom extension that can be written for the program: it is implemented in the form of a Multiline Text Box that acts as a event logger of the various APIs and callbacks that NDIS Monitor can call on it.

When the extension is selected, the program tries to load and initialize the Device Driver that will hook into NDIS in order to give back to the user mode application informations about the packets in transit. Then a list of all the NDIS Protocols and corresponding open NDIS Adapters is shown (see the screenshot at the beginning of this article): from that list the user is required to select the Adapters whose sent and received packets are to be displayed in the program user interface. Tipically you would look for a specific network card name in the list and then select it for monitoring or select special NDIS Protocols such as "TCPIP_WANARP" that will give you access to the exchange of packets that occurs to and from WAN Adapters eventually installed in your system (like ADSL Modems, for example).

WRITING AN EXTENSION

A NDIS Monitor Extension is implemented as a .NET WinForms User Control. It receives from the application indications about all the packets that are sent and received through the specified interfaces. The main purpose of an Extension is to present to the user an interface for dealing with the captured network packets. If you want to write a filter or a simple analyzer for the incoming and/or outcoming traffic through one or more NIC interfaces, write a script through the "C# Code Window" feature of the "Standard" Extension (more on this later).

To write an Extension for NDIS Monitor follow these steps (refer to the NmExampleExtension project for a real implementation):

     Open Visual Studio .NET, create a C# or VB.NET "Class Library" and then create in that project a "WinForm User Control".
     Reference the "NmExtension" assembly.
     Import the "NdisMonitor" namespace.
     Assign the "ExtensionAttribute" attribute to the User Control class specifying the human name to assign to the extension itself.
     Make the User Control class implement the "INmExtension" interface.
     Implement the "INmExtension" interface. Its layout is as follows:
public interface INmExtension
{
      // >>ProcessNextPacket<<: called when a new packet arrives.
      bool ProcessNextPacket( RawPacket rp, NdisHookStubs.NEXT_PACKET np, int ord, DateTime tm );
 
      // >>Showing<<: called when NDIS Monitor is about to display the extension.
      void Showing ( LogFn logFn, NdisHookStubs.NT_PROTOCOL_LIST protList, MenuItem popupMenu );
      // >>Hiding<<: called when NDIS Monitor is hiding this extension.
      void Hiding ();
 
      // >>Disposing<<: called when user presses the STOP button. We should free here ANY resource allocated.
      void Disposing ();
 
      // >>UserCommand<<: called when a new command is entered in the OUTPUT window.
      bool UserCommand( string s );
}

The "Showing" method is provided with a reference to a delegate for writing in the Output Window (tipically you should save this reference in a field of your class for later use in the other methods) and with a reference to an instance of type "MenuItem" that represents the popup menu reserved to the extension in the program menu bar. If no items are added to the popup menu, then the application doesn't display the menu tag at all.

The most important method is "ProcessNextPacket". In the implementation of this method you should place code that populate a List View, for example. Remember that the RawPacket and NEXT_PACKET structures both represent the same packet: the only difference is that the RawPacket instance is an abstract representation of the packet (see the Scripting section below), while the NEXT_PACKET object is the raw representation of the packet data coming directly from the kernel mode "callback". The return value of this method indicates whether the Extension "accepted" or not the transmitted packet: this usually refers to the action the Extension has taken in regard to the packet itself, whether, for example, it has displayed it or not in its user interface. This boolean value is meaningful when saving the packet log through the "File -> Save" command: the application will ask whether to save all the packets or only the "accepted" ones.

SCRIPTING

When the "Standard" extension is selected, in the "Extension" menu it is possible to open the "C# Code Window". This window gives access to the scripting features of NDIS Monitor. From this window you can programmatically tell to NDIS Monitor what to do when a new packet arrives from the Kernel Driver and what to do when the user types something in the Output window ("View -> Output window" command).

The script in this window can be compiled at any time pressing the "Alt+Enter" combination. If no error is found in the source, then the script logic is instantly enforced by NDIS Monitor and, specifically, all the incoming and outcoming packets from the selected NIC interfaces are passed to the "ProcessNextPacket" implementation for evaluation.

Using the script feature allows to write filters and analyzers of any kind on the captured packet data that operate in real-time (in normal conditions) or, at will, off-line when opening a packet log. This is the source of the standard script file:

using System;
using NdisMonitor;
 
class UserHook
{
      //
      // Called when a new packet arrives.
      //
      publicbool ProcessNextPacket( ProcessNextPacketFn impl, LogFn log, RawPacket rp, NdisHookStubs.NEXT_PACKET np, int ord, DateTime tm )
      {
            //
            // Call the extension implementation.
            //
            // Here you can setup a filter for the new packets, for example. You can discard the
            // packets in which you are not interested, according to the source or destination
            // port, the IP protocol etc. etc. These are few examples:
            //
            // === EXAMPLE # 1 ===
            //  if ( rp is EthernetPacket && ((EthernetPacket)rp)._tranHeader is TranProt_TCP )
            //  {
            //     TranProt_TCP            tcp = (TranProt_TCP) ((EthernetPacket)rp)._tranHeader;
            //     if ( tcp._srcPort == 80 && np._bDirection == 0 /*RECV*/ )
            //       return impl( rp, np, ord, tm );
            //  }
            //  return false;
            //
            return impl( rp, np, ord, tm );
      }
 
      //
      // Called when the user enters a command in the output window.
      //
      publicbool UserCommand( UserCommandFn impl, LogFn log, string s )
      {
            //
            // Call the extension implementation.
            // Here you can filter/manipulate/discard the string of the command entered.
            //
            return impl( s );
      }
}

As you can see from the source above, the "ProcessNextPacket" function has the same parameters of the method with the same name exposed by the "INmExtension" interface, plus two references to two delegates. The first delegate points to the original implementation of the "ProcessNextPacket" function from the "INmExtension" interface implemented by the "Standard" extension: you can choose to call or not the original implementation thus causing, in this case, the log of that packet in the List View of the "Standard" extension. The second delegate points to a function for writing in the Output window.

The instance of the "UserHook" type that you define in the Script window can have its fields and state: the program creates only an instance of this class immediately after a successful compilation and then calls the callback methods on this same instance until the application is closed or a new compilation is initiated from the "C# Code Window".

THE RAWPACKET CLASS HIERARCHY

The RawPacket class is used to represent packet data in an abstract manner. When a new packet arrives from the Kernel Driver, NDIS Monitor converts the byte blob of the packet into a more readable and parsable representation: a RawPacket instance. For example, for representing the source IP address value contained in the IP header of a packet, the "NetProt_IP" class (that represents the IP header itself) contains a field with name "_srcIP" of type "UInt32". In the constructor of the "NetProt_IP" class, this field is populated reading the actual value from the byte vector passed as parameter to the constructor itself, as part of the process of creation of the RawPacket instance.

In addition, the RawPacket classes are parsed through Reflection by NDIS Monitor whenever there is the need to show the byte contents of a selected packet in the "Packet Viewer" window: reading the values and type details of each field allows, for example, to highlight in the byte blob of the packet the bytes that are relative to the "NetProt_IP" class (the IP header of the packet) and to show a descriptive representation of the IP header itself in the List Box at the lower portion of the window. The last screenshot at the beginning of this article shows what a "Packet Viewer" window tipically looks like when working with the application.

The Attributes that are applied to the classes derived from "Packet_Part" are used by the "Packet Viewer" window in order to obtain more accurate informations about the positions and sizes of the fields inside the corresponding portions of the packet byte blobs.

Here is a description of all the classes involved:

Packet_Part

This class represents a portion of physical data inside a byte blob. This is the layout:

public abstract class Packet_Part
{
      // data.
      public int               _length;
          // _length: length in bytes of this portion of data.
}

RawPacket

This class is the base class from which all the instances of an abstract packet representation must inherit. For example, the EthernetPacket class inherits from RawPacket. This is the layout:

public class RawPacket
{
      // data.
      public byte[]            _data;
          // _data: byte blob of the packet.
 
      // methods.
      public static RawPacket GET( byte[] data );
          // GET: constructs an instance of RawPacket starting from a byte blob.
 
      // overrideables.
      public virtual Packet_Part[] GetParts ();
          // GetParts: when overridden in a derived class, returns a vector
          // containing the "Packet_Parts" that constitute this packet.
}

EthernetPacket

This class represents an Ethernet packet. This is the layout:

public class EthernetPacket : RawPacket
{
      // data.
      public Ethernet_Base                 _macHeader;
          // _macHeader: MAC header of the packet.
      public Network_Protocol              _netHeader;
          // _netHeader: network protocol header of the packet.
      public Transport_Protocol            _tranHeader;
          // _tranHeader: transport protocol header of the packet.
      public Packet_Part[]                 _packetData;
          // _packetData: application protocol parts.
 
      // methods.
      public static new EthernetPacket GET( byte[] data );
          // GET: gets an instance of an EthernetPacket starting from a byte blob.
 
      // overrides.
      public override Packet_Part[] GetParts ();
          // GetParts: returns a vector containing all the "Packet_Parts" of
          // this EthernetPacket.
}

One interesting feature of this class is the "_packetData" vector: you can set (through a Script or a Custom Extension) this field to a reference to a vector of "Packet_Parts" that can be later used and parsed by the "Packet Viewer" window in order to display the packet data in a more readable format or that can be referenced when writing filter and analyzer script code that can thus work at the Application Layer level.

Ethernet_Base, Ethernet_II, Ethernet_802_3, Ethernet_802_2, Ethernet_SNAP

These classes are used to represent the MAC header of the packet. This is the layout:

[ PartInfo( "Ethernet base header" ) ]
public abstract class Ethernet_Base : Packet_Part
{
      // data.
      [ FieldInfo( "MAC Dest Address", 0, PrintFn = "MacDstToString" ) ]
      public byte[]                  _macDst;
      [ FieldInfo( "MAC Src Address", 6, PrintFn = "MacSrcToString" ) ]
      public byte[]                  _macSrc;
 
      // methods.
      public string MacDstToString ();
      public string MacSrcToString ();
}
 
[ PartInfo( "Ethernet II header" ) ]
public class Ethernet_II : Ethernet_Base
{
      // data.
      [ FieldInfo( "Ethertype", 12 ) ]
      public UInt16                  _eType;
}
 
[ PartInfo( "Ethernet 802.3 header" ) ]
public class Ethernet_802_3 : Ethernet_Base
{
      // data.
      [ FieldInfo( "Total Packet Len", 12 ) ]
      public UInt16                  _totPacketLen;
}
 
[ PartInfo( "Ethernet 802.2 header" ) ]
public class Ethernet_802_2 : Ethernet_802_3
{
      // data.
      [ FieldInfo( "DSAP", 14 ) ]
      public Byte              _dSap;
      [ FieldInfo( "SSAP", 15 ) ]
      public Byte              _sSap;
      [ FieldInfo( "Control", 16 ) ]
      public Byte              _control;
}
 
[ PartInfo( "Ethernet SNAP header" ) ]
public class Ethernet_SNAP : Ethernet_802_2
{
      // data.
      [ FieldInfo( "Initial Bytes", 17 ) ]
      public byte[]                  _snapSubHdrStart;
      [ FieldInfo( "Ethertype", 20 ) ]
      public UInt16                  _ethernetIIType;
}

Network_Protocol, NetProt_Undefined, NetProt_IP

These classes are used to represent the Network Protocol header of the packet. This is the layout:

public abstract class Network_Protocol : Packet_Part
{
}
 
public class NetProt_Undefined : Network_Protocol
{
}
 
[ PartInfo( "IP Network Protocol header" ) ]
public class NetProt_IP : Network_Protocol
{
      // data.
      [ FieldInfo( "IP Version", 0, Size = 1 ) ]
      public EIpVersion              _version;
      [ FieldInfo( "IHL", 0 ) ]
      public byte                    _ihl;
      [ FieldInfo( "Tos Precedence", 1, Size = 1 ) ]
      public EIpTosPrecedence        _tosPrec;
      [ FieldInfo( "Tos Minimize Delay", 1 ) ]
      public bool                    _tosMinimizeDelay;
      [ FieldInfo( "Tos Maximize Throughput", 1 ) ]
      public bool                    _tosMaximizeThroughput;
      [ FieldInfo( "Tos Maximize Reliability", 1 ) ]
      public bool                    _tosMaximizeReliability;
      [ FieldInfo( "Tos Minimize Monetary Cost", 1 ) ]
      public bool                    _tosMinimizeMonetaryCost;
      [ FieldInfo( "Total Length", 2 ) ]
      public ushort                  _totalLength;
      [ FieldInfo( "Identification", 4 ) ]
      public ushort                  _identification;
      [ FieldInfo( "Flags Dont Fragment", 6, Size = 1 ) ]
      public bool                    _flagsDontFragment;
      [ FieldInfo( "Flags More Fragments", 6, Size = 1 ) ]
      public bool                    _flagsMoreFragments;
      [ FieldInfo( "Fragment Offset", 6 ) ]
      public ushort                  _fragmentOffset;
      [ FieldInfo( "TTL", 8 ) ]
      public byte                    _ttl;
      [ FieldInfo( "Protocol", 9, Size = 1 ) ]
      public EIpProtocol             _protocol;
      [ FieldInfo( "Hdr Checksum", 10 ) ]
      public ushort                  _hdrChecksum;
      [ FieldInfo( "Source IP", 12, PrintFn = "SrcIPToString" ) ]
      public uint                    _srcIP;
      [ FieldInfo( "Destination IP", 16, PrintFn = "DstIPToString" ) ]
      public uint                    _dstIP;
 
      // methods.
      public string SrcIPToString();
      public string DstIPToString ();
}

Transport_Protocol, TranProt_Undefined, TranProt_ICMP, TranProt_TCP, TranProt_UDP

These classes are used to represent the Transport Protocol header of the packet. This is the layout:

public abstract class Transport_Protocol : Packet_Part
{
}
 
public class TranProt_Undefined : Transport_Protocol
{
}
 
[ PartInfo( "ICMP Transport Protocol header" ) ]
public class TranProt_ICMP : Transport_Protocol
{
      // data.
      [ FieldInfo( "Type", 0, Size = 1 ) ]
      public EIcmpType               _type;
      [ FieldInfo( "Code", 1 ) ]
      public byte                    _code;
      [ FieldInfo( "Hdr Checksum", 2 ) ]
      public ushort                  _hdrChecksum;
}
 
[ PartInfo( "TCP Transport Protocol header" ) ]
public class TranProt_TCP : Transport_Protocol
{
      // data.
      [ FieldInfo( "Source Port", 0 ) ]
      public ushort                  _srcPort;
      [ FieldInfo( "Destination Port", 2 ) ]
      public ushort                  _dstPort;
      [ FieldInfo( "Sequence Number", 4 ) ]
      public uint                    _sequenceNum;
      [ FieldInfo( "ACK Number", 8 ) ]
      public uint                    _ackNum;
      [ FieldInfo( "Data Offset", 12 ) ]
      public byte                    _dataOff;
      [ FieldInfo( "Reserved", 12 ) ]
      public byte                    _reserved;
      [ FieldInfo( "ECN NS", 12 ) ]
      public bool                    _ecnNS;
      [ FieldInfo( "ECN CWR", 13 ) ]
      public bool                    _ecnCWR;
      [ FieldInfo( "ECN ECE", 13 ) ]
      public bool                    _ecnECE;
      [ FieldInfo( "Control URG", 13 ) ]
      public bool                    _controlURG;
      [ FieldInfo( "Control ACK", 13 ) ]
      public bool                    _controlACK;
      [ FieldInfo( "Control PSH", 13 ) ]
      public bool                    _controlPSH;
      [ FieldInfo( "Control RST", 13 ) ]
      public bool                    _controlRST;
      [ FieldInfo( "Control SYN", 13 ) ]
      public bool                    _controlSYN;
      [ FieldInfo( "Control FIN", 13 ) ]
      public bool                    _controlFIN;
      [ FieldInfo( "Window", 14 ) ]
      public ushort                  _window;
      [ FieldInfo( "Check Sum", 16 ) ]
      public ushort                  _checkSum;
      [ FieldInfo( "Urgent Pointer", 18 ) ]
      public ushort                  _urgentPtr;
}
 
[ PartInfo( "UDP Transport Protocol header" ) ]
public class TranProt_UDP : Transport_Protocol
{
      // data.
      [ FieldInfo( "Source Port", 0 ) ]
      public ushort                  _srcPort;
      [ FieldInfo( "Destination Port", 2 ) ]
      public ushort                  _dstPort;
      [ FieldInfo( "Packet Length", 4 ) ]
      public ushort                  _packetLength;
      [ FieldInfo( "Check Sum", 6 ) ]
      public ushort                  _checkSum;
}

THE LOOPBACK ADAPTER TRICK

One request I received when developing NDIS Monitor was to allow the user to intercept the packet traffic that occurs in loopback when referencing an host such as 127.0.0.1 or localhost. The problem is that even with programs like Microsoft Network Monitor the loopback requests that are sent from the local computer do not even reach the NIC card: they are resolved earlier in the TCP/IP stack.

The solution I have studied for resolving this problem involves the installation of the Microsoft Loopback Adapter on the end-user machine and the use of an alternative IP address in place of the usual 127.0.0.1. Basically what happens is that all the requests that are directed to the new IP address are intercepted by the program and then redirected back to the sender as if they originated from an external host. So, when making requests to the new IP address the local computer will believe to talk with an external host through the Loopback Interface and so the NDIS Monitor Kernel Driver will be able to intercept the packet data, forward the bytes to the user mode counterpart and then send back that data to the calling NDIS Protocol, so fooling the local computer into thinking that it is talking to another system and so continuing to send and receive UDP, TCP and ICMP packets.

This trick works even if your computer is not connected to any network.

CONFIGURING THE LOOPBACK ADAPTER TRICK

First, you have to install the Microsoft Loopback Adapter. The MLA is like any other NIC Miniport driver: the main difference is that it doesn't control any hardware; it is installed in a system, a Local Area Connection is created for it automatically and above all an IP address is assigned to it.

To install the MLA, follow these steps (taken from the "support.microsoft.com" site, specific to Windows XP):

     Click Start, and then click Control Panel.
     If you are in Classic view, click Switch to Category View under Control Panel in the left pane.
     Double-click Printers and Other Hardware, and then click Next.
     Under See Also in the left pane, click Add Hardware,and then click Next.
     Click Yes, I have already connected the hardware, and then click Next.
     At the bottom of the list, click Add a new hardware device, and then click Next.
     Click Install the hardware that I manually select from a list, and then click Next.
     Click Network adapters, and then click Next.
     In the Manufacturer box, click Microsoft.
     In the Network Adapter box, click Microsoft Loopback Adapter, and then click Next.
     Click Finish.

Then open a Console Window (Start -> Run -> "cmd") and type "ipconfig /all". Search for the Connection that has as the description string something similar to "Microsoft Loopback Adapter". Copy in the clipboard the corresponding IP address.

Open NDIS Monitor -> View Menu -> Settings. In the "Loopback Adapter IP" field paste the IP address of the Loopback Interface. Then click on the check box that activates the "Loopback Adapter Trick". Note that the program automatically generates in the "Loopback NAT IP" field the new IP address that has to be used in place of 127.0.0.1. Copy it in the clipboard or simply write it down.

Stop and restart the capture using the buttons in the program toolbar. When prompted for selecting the NDIS Adapter to hook, don't forget to select the "Microsoft Loopback Adapter" from the list. Remember that only activating the NDIS Hook on that interface from this window enables the NAT feature to work.

DOWNLOAD

Download NDIS Monitor .NET v1.00 (binaries only) from here (424KB).
Download NDIS Monitor .NET v1.00 (plus source code) from here (563KB).
Download the NDIS Monitor .NET v1.00's Kernel Driver from here (22KB).

 Quotes
"Among the Windows experts I know personally, no one can beat Vito Plantamura."
- Francesco Balena, Code Architects SRL

"Your NDIS Monitor application, is amongst the most impressive networking code I have seen on the .Net framework."
- Ben Hakim.
 Photos
Various images from italian conferences and events (keep the mouse on a thumbnail for a short description):
Me at the Microsoft/HP/Intel organized Route64 event in Milan in May 2005, explaining how COM+ behaves on 64-bit Microsoft operating systems. I was there with the friends of Code Architects.
Me at the Microsoft Security Roadshow event in Bari in April 2006, explaining how the logon process works in Windows NT. There were 250 attendees.
Microsoft Security Roadshow 2006 in Treviso. This is an image of the huge 700-seats conference room.
Me at the Microsoft Security Roadshow 2006 in Treviso. This is a moment of the 3-hours session.
 Site login
NOTE: Actually the login feature is used only for administrative and content management purposes.
Username

Password

Everything here (code, binaries, text, graphics, design, html) is © 2010 Vito Plantamura and VPC Technologies SRL (VATID: IT06203700965).
If you download something (compilable or not) from the site, you should read the license policy file.
If you want to contact me via email, write at this address.