SKINNED WINDOWS WITH CSkinnedDialog
CSkinnedDialog allows you to have in your MFC applications dialogs with the window frame and control buttons rendered from a bitmap.

This screenshot is from my ImageDownloader application. The source code that accompanies this article is used to render and manage windows with that shape and control buttons.
INTRODUCTION
CSkinnedDialog is a MFC class that I wrote in 2001 that allows to have windows with a custom bitmap applied to them. When I wrote ImageDownloader, I searched the web for a class like this ready to be used, but I found nothing. So, I wrote myself this CSkinnedDialog class that does just that: it replaces the default frame of the window and the standard control buttons with bitmaps taken from a bmp resource specified when initializing the class itself.
The resulting implementation takes roughly 2000 lines of code: I had to reimplement many of the standard features of a normal window (such as moving and button state management) for obtaining just the final effect I had in mind. Specifically the messages that the implementation subclass are the following:
 |
WM_PAINT |
 |
 |
WM_ERASEBKGND |
 |
 |
WM_NCPAINT |
 |
 |
WM_GETMINMAXINFO |
 |
 |
WM_SIZE |
 |
 |
WM_NCHITTEST |
 |
 |
WM_NCACTIVATE |
 |
 |
WM_NCLBUTTONDOWN |
 |
 |
WM_NCLBUTTONUP |
 |
 |
WM_NCRBUTTONDOWN |
 |
 |
WM_NCRBUTTONUP |
 |
 |
WM_LBUTTONDOWN |
 |
 |
WM_LBUTTONUP |
 |
 |
WM_RBUTTONDOWN |
 |
 |
WM_RBUTTONUP |
 |
 |
WM_MOUSEMOVE |
 |
 |
WM_NCMOUSEMOVE |
 |
 |
WM_SETCURSOR |
 |
 |
WM_INITMENU |
 |
 |
WM_LBUTTONDBLCLK |
 |
 |
WM_NCLBUTTONDBLCLK |
 |
 |
WM_CAPTURECHANGED |
 |
 |
WM_CTLCOLOR |
The implementation is divided in the following files:
 |
SkinnedDialog.cpp |
 |
 |
SkinnedDialog.h |
 |
 |
SkinnedWndCompanionObj.cpp |
 |
 |
SkinnedWndCompanionObj.h |
HOW TO USE
In the project settings, do the following:
 |
Include the four source files that implement CSkinnedDialog (as specified in the previous section) in the project. You can find them in the zip archive included with this article. |
In the dialog header file follow these steps:
 |
Include the "SkinnedDialog.h" file. |
 |
 |
Derive your class from CSkinnedDialog rather than CDialog. |
In the dialog source file follow these steps:
 |
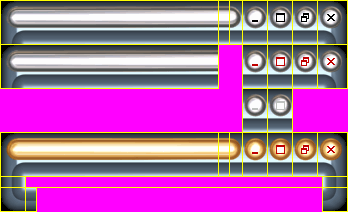
In the class constructor definition, initialize the CSkinnedDialog base class with the same parameters you passed to the CDialog implementation, plus an additional UINT value that must be set to the identifier of the bitmap resource used for drawing the window frame and buttons. An optional fourth parameter can be set to the chroma key color used when rendering the bitmap (the default value is RGB( 223, 248, 255 )). The bitmap format and appearance must be as the following example (you can find in the res directory of the zip archive included with this article an usable .BMP version with any window caption specified):
 |
 |
 |
Replace the CDialog identifier with the CSkinnedDialog name in the BEGIN_MESSAGE_MAP definition and in the OnInitDialog handler (when calling the base implementation). In your implementation, from this point on, even for the code generated by the ClassWizard, you must call the CSkinnedDialog implementation instead of the CDialog one when you intend to call a base class method. |
HOW TO CHANGE THE BITMAP
The default bitmap that is included in this example and that is used by ImageDownloader was created by myself with 3DStudio MAX and can be replaced with ease following the instructions in this section.
In the SkinnedWndCompanionObj.cpp you can find the following code:
static RECT g_vrctLayout[ EL_END_OF_LIST ] = {
	{ 1, 1, 217, 43 },
	{ 219, 1, 228, 43 },
	{ 230, 1, 241, 43 },
	{ 243, 1, 266, 43 },
	{ 268, 1, 291, 43 },
	{ 293, 1, 316, 43 },
	{ 318, 1, 346, 43 },
	{ 1, 45, 217, 87 },
	{ 243, 45, 266, 87 },
	{ 268, 45, 291, 87 },
	{ 293, 45, 316, 87 },
	{ 318, 45, 346, 87 },
	{ 243, 89, 266, 131 },
	{ 268, 89, 291, 131 },
	{ 1, 133, 217, 175 },
	{ 219, 133, 228, 175 },
	{ 230, 133, 241, 175 },
	{ 243, 133, 266, 175 },
	{ 268, 133, 291, 175 },
	{ 293, 133, 316, 175 },
	{ 318, 133, 346, 175 },
	{ 1, 177, 24, 186 },
	{ 323, 177, 346, 186 },
	{ 1, 188, 24, 210 },
	{ 26, 188, 35, 210 },
	{ 323, 188, 346, 210 }
};
This is a coordinates map that the implementation uses in order to identify the window elements inside the specified bitmap. Each item of the vector is identified by the following ENUM:
static enum eLayout
{
	EL_NormalCaption = 0,
	EL_NormalSideUp,
	EL_NormalSideUp2,
	EL_NormalMinimize,
	EL_NormalMaximize,
	EL_NormalRestore,
	EL_NormalClose,
	EL_RedCaption,
	EL_RedMinimize,
	EL_RedMaximize,
	EL_RedRestore,
	EL_RedClose,
	EL_GrayMinimize,
	EL_GrayMaximize,
	EL_GoldCaption,
	EL_GoldSideUp,
	EL_GoldSideUp2,
	EL_GoldMinimize,
	EL_GoldMaximize,
	EL_GoldRestore,
	EL_GoldClose,
	EL_SideLeft,
	EL_SideRight,
	EL_CornerLeftDown,
	EL_SideDown,
	EL_CornerRightDown,
	EL_END_OF_LIST
};
With a bit of work and a painting program, you can replace the old coordinates inside the g_vrctLayout vector with the new ones, that refer to the new bitmap you intent to apply to your dialogs.
In the "SetWindowRgn" function you can modify the ellipse aspect coordinates passed to the "CreateRoundRectRgn" Win32 function to modify the shape of the window region specified for each instance of the CSkinnedDialog class.
DOWNLOAD
Download the CSkinnedDialog example (source code) from here (94KB).
|